Understanding our API
Source Code: The sample Node.js API can be found at this GitHub repo.
We'll need to create a Node.js API to provide data to our Angular application. The API's endpoints will be secured with Auth0 and we'll ensure different users have different access based on their roles and permissions.
For brevity, we will not actually write the API code in the workshop, but will examine the code and understand how it works before using it in our Angular application.
Configuration
Let's add our Auth0 configuration to the .env environment file:
PORT=3005
ISSUER_BASE_URL=https://{authorization_server_issuer} // e.g., https://{you}.auth0.com
ALLOWED_AUDIENCES={audiences,comma-separated} // e.g., https://secure-dino-api
ROLES_CLAIM_NAMESPACE={collision-resistant roles namespace} // e.g., https://secure-dino-api/roles
Here we will add our Auth0 domain, API identifier (audience here), and roles rule namespace.
Note: This config file is excluded from source control by the
.gitignorefile.
Server File
Open the server.js file and add the following code:
// General Dependencies
require('dotenv').config();
const express = require('express');
const bodyParser = require('body-parser');
const cors = require('cors');

// App
const routes = require('./routes');
const app = express();
app.use(bodyParser.json());
app.use(bodyParser.urlencoded({ extended: false }));
app.use(cors());

// Routes
app.use('/', routes);

// Server
const port = process.env.PORT || '3005';
app.listen(port, () => console.log(`Server running on localhost:${port}`));
When started, the server will run on localhost at http://localhost:3005.
API Routes
Open the routes.js file and add this code:
// Source
const source = require('./data/dinosaurs.json');
// Modifiable data
let dinosData = [...source];
// Returns simplified dinosaurs listing
const getDinosList = () => {
  return dinosData.map(dino => {
    return {
      name: dino.name,
      pronunciation: dino.pronunciation,
      favorite: dino.favorite ? dino.favorite : false
    }
  });
}
// Simulate live server call by adding random delay
const delay = () => Math.random() * 2500;

// AUTHORIZATION
// Accessing secure routes requires access
// token from issuer specified in .env config
const { auth, strategies, requiredScopes } = require('express-oauth2-bearer');
const authCheck = auth(strategies.openid());
// Verify user has appropriate role in custom token claims
const createError = require('http-errors');
const requiredRole = (role) => {
  return (req, res, next) => {
    if (
      req.auth &&
      req.auth.claims &&
      req.auth.claims[process.env.ROLES_CLAIM_NAMESPACE].indexOf(role) > -1
    ) {
      return next();
    } else {
      return next(
        createError(401, 'You do not have sufficient permissions to access this resource.')
      );
    }
  }
};

/*
 |--------------------------------------
 | API Routing
 |--------------------------------------
*/

const express = require("express");
const router = express.Router();

// GET basic dinosaur listing (public)
router.get('/api/dinosaurs', (req, res) => {
  setTimeout(() => {
    res.json(getDinosList());
  }, delay());
});

// GET dinosaur details by name (secure)
// Requires access token; delegated access w/ scope
router.get('/api/secure/dinosaur/:name',
  authCheck,
  requiredScopes('read:dino-details'),
  (req, res) => {
    setTimeout(() => {
      const name = req.params.name;
      const thisDino = dinosData.find(dino => dino.name.toLowerCase() === name);
      res.json(thisDino);
    }, delay());
  }
);

// POST toggles dino as a favorite (secure)
// Requires access token; delegated access w/ scope
// Requires ['editor'] user roles claim value
// Dinosaur name must be provided in body
router.post('/api/secure/fav',
  authCheck,
  requiredScopes('write:dino-fav'),
  requiredRole('editor'),
  (req, res) => {
    setTimeout(() => {
      const dinoName = req.body.name;
      const matchingDino = dinosData.filter(d => d.name === dinoName)[0];
      if (!matchingDino) {
        res.status(404).send({error: `Cannot find a dinosaur called "${dinoName}"`});
      } else {
        if (matchingDino.hasOwnProperty('favorite')) {
          matchingDino.favorite = !matchingDino.favorite;
        } else {
          matchingDino.favorite = true;
        }
        // Update modifiable data in the local dinosData store
        const index = dinosData.findIndex(d => d.name === dinoName);
        const newData = dinosData.map((dino, i) => {
          if (i === index) {
            return Object.assign({}, dino, matchingDino);
          }
          return dino;
        });
        dinosData = newData;
        // Return (updated) matching dinosaur details JSON
        res.json(matchingDino);
      }
    }, delay());
  }
);

module.exports = router;
Our API is going to expose three endpoints: /api/dinosaurs, /api/secure/dinosaur/:name, and /api/secure/fav.
The /api/dinosaurs endpoint is going to be public, so anybody regardless of their authentication status will be able to access it and get the list of dinsoarus.
The /api/secure/dinosaur/:name endpoint is going to be secured and require a user to be authenticated. In addition to being authenticated, the API will also require the user to have the read:dino-details scope.
Finally, the /api/secure/fav endpoint is going to be secured and require a user to be authenticated. In addition the user will have to have the write:dino-fav scope as well as a custom role of editor to be able to succesfully interact with the endpoint.
Serve the API
To start the server, run the following command from the root of the folder containing your server.js file:
node server
Alternatively, you could install nodemon, which monitors the server for changes and restarts it automatically:
npm install -g nodemon
nodemon server
When served, the API will be available at http://localhost:3005/.
Postman Collection
Working with the API by calling the endpoint with our browser will only get us so far in understanding how the API works. For a better experience, install the Postman collection for our API.
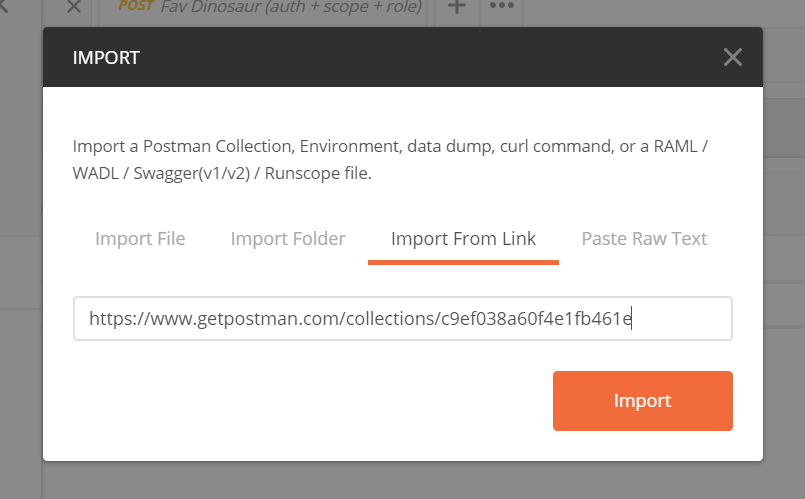
To install the collection, open Postman, navigate to the file menu and select Import. From here, select the Import from Link tab and paste in the provided url: https://www.getpostman.com/collections/c9ef038a60f4e1fb461e. Finally, click the Import button and the collection will be loaded and created.
Navigate to the Collections tab and you should see the newly imported collection called node-secure-dino-api which will have 3 requests available to use. We will be using Postman for the rest of our API examples.
Token Minter
If you've tried to call any of the Postman endpoints besides the Dinosaurs List, you've likely received errors saying that you are not authorized to access the resource. Let's fix that. We'll use the Token Minter tool to help us generate JSON Web Tokens that can serve as our authentication and authorization artifacts.
To get started navigate to https://token-minter.kmaida.io/. To get an access_token that you can use with the secure-dinos-api, you'll need to enter your Auth0 credentials. In this case, you'll need the Domain, Client ID, Audience, and optionally Scope. We'll walk through these together.
Custom Rule - User Role
For our API, one of the endpoints also requires a custom claim. Our Angular application, or Token Minter thus far, does not have permission alone to grant this scope. We will implement a custom Auth0 Rule, that will allow us to add this custom roles claim to our access_token.
Auth0 Rules are JavaScript functions that are executed in Auth0 as part of the transaction every time a user authenticates. In this way, rules allow you to easily customize and extend your authentication process. We want to use a rule to add a role to users that log into our app. In this manner, we can authorize specific user roles in different ways.
Go to the Rules section in the Dashboard sidebar and click the +Create Rule button. Choose the Empty Rule template. (Alternatively, you could choose the Set roles to a user template and modify it according to your needs.)
Add the following code as shown below:
// Set roles to a user
function (user, context, callback) {
  // Make sure the user has verified their email address
  if (!user.email || !user.email_verified) {
    return callback(new UnauthorizedError('Please verify your email before logging in.'));
  }
  user.app_metadata = user.app_metadata || {};
  var addRolesToUser = function(user, cb) {
    // Replace {YOUR_FULL_EMAIL_HERE} with your own email address
    if (user.email && user.email === '{YOUR_FULL_EMAIL_HERE}') {
      cb(null, ['editor']);
    } else {
      cb(null, []);
    }
  };
  addRolesToUser(user, function(err, roles) {
    if (err) {
      callback(err);
    } else {
      user.app_metadata.roles = roles;
      auth0.users.updateAppMetadata(user.user_id, user.app_metadata)
        .then(function(){
          var namespace = 'https://secure-dino-api/roles';
          var userRoles = user.app_metadata.roles;
          context.idToken[namespace] = userRoles;
          context.accessToken[namespace] = userRoles;
          callback(null, user, context);
        })
        .catch(function(err){
          callback(err);
        });
    }
  });
}
Set up a pattern for the editor user to be specifically identified. The example above uses email matching with strict equality. Make sure you also add the app metadata containing your roles to the accessToken as well as the idToken. The access token will provide data to our API so we can verify that the user has the appropriate role when they request resources.
Note: You can use any type of condition you'd like to identify admin users: by email, provider, name, domain, etc.
The namespace identifier in the addRolesToUser() callback function can be any non-Auth0 HTTP or HTTPS URL and does not have to point to an actual resource. Auth0 enforces this recommendation from OIDC regarding additional claims and will silently exclude any claims that do not have a namespace. You can read more about implementing custom claims with Auth0 here.
Click the Save button to save your rule. It will then be enabled by default.